Knowing Your Siding Before You Start Cleaning
Jumping into cleaning your house siding with a one-size-fits-all approach is a common, and often costly, mistake. Many homeowners learn the hard way that the secret to a great result isn’t just about the cleaning solution or the equipment; it’s about understanding the material you’re working with first. Each type of siding—be it vinyl, aluminum, wood, fiber cement, or brick—has its own unique personality and requires a specific touch.
Think of it like doing laundry. You wouldn’t throw a delicate silk shirt in the same hot water cycle as your sturdy work jeans. Similarly, the aggressive pressure washing that might make a brick facade sparkle could shred wood siding or force water behind vinyl panels, leading to unseen mold growth and damage. Recognizing your siding material is the critical first step in learning how to clean siding on house without causing harm.
Why Your Siding Material Matters So Much
The material of your siding dictates everything: the type of cleaning solution you can safely use, the right tools for the job, and most importantly, how much pressure it can withstand. For instance, vinyl is a resilient and popular choice, but it can crack under high pressure, especially when it’s older and more brittle. Wood siding, on the other hand, is susceptible to water damage and requires a gentler touch to avoid stripping paint or gouging the soft grain.
This chart visualizes the recommended maximum pressure levels for some common siding materials.
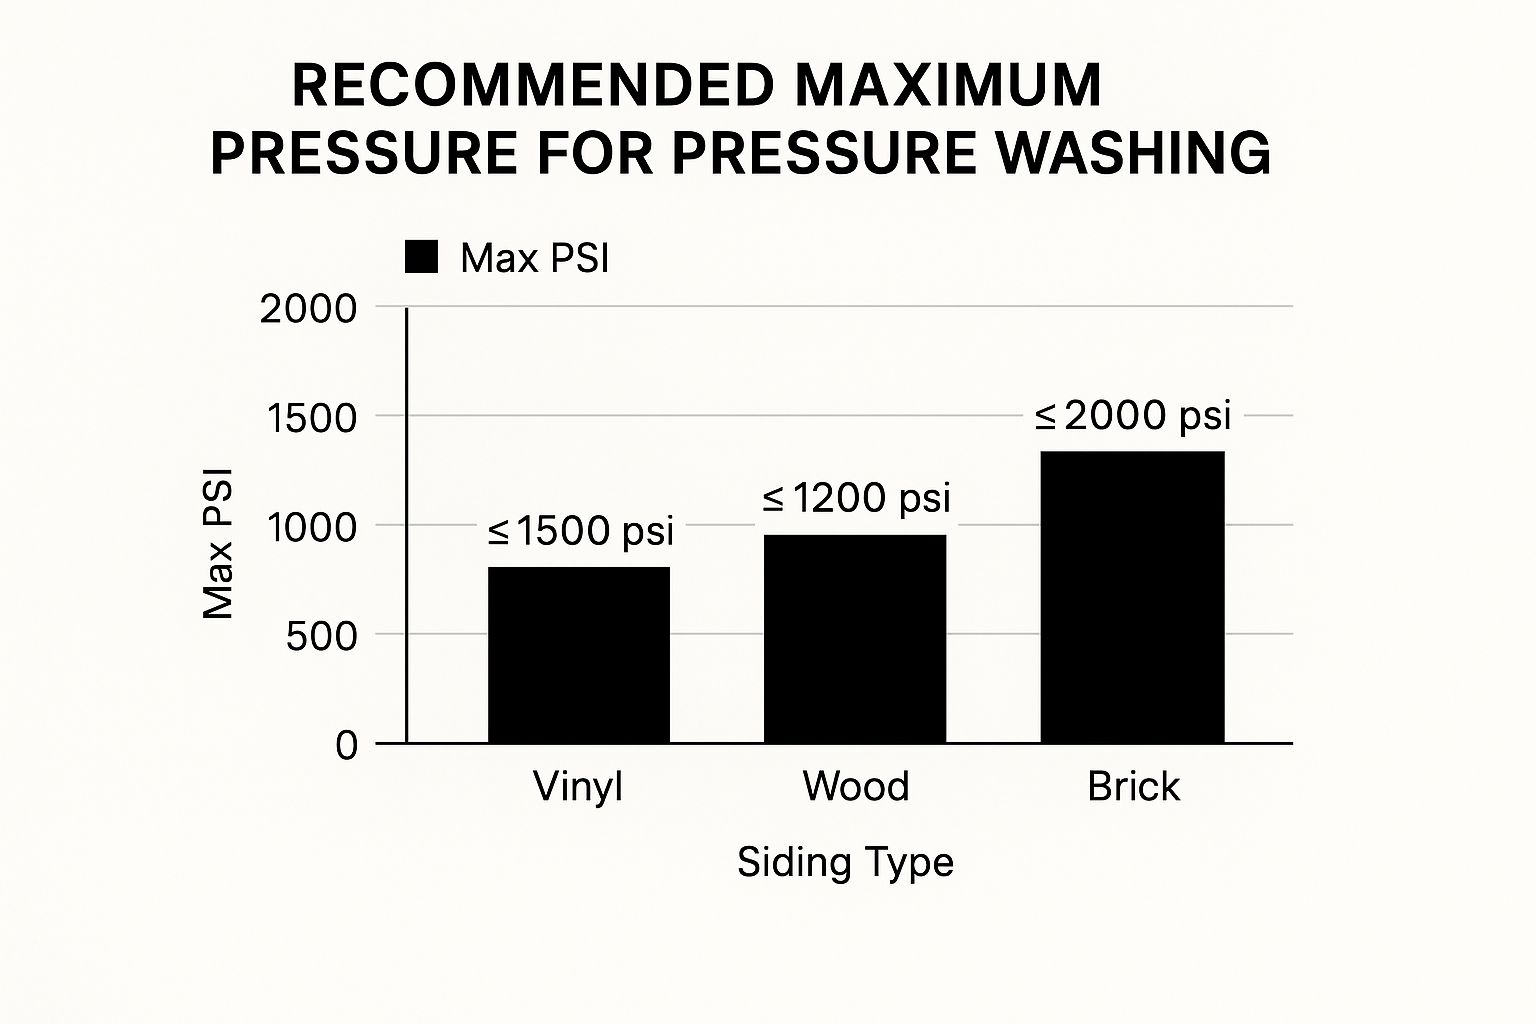
As the data shows, using the same pressure washer setting for brick on your wood siding could apply nearly double the recommended force, risking serious damage.
To help you plan your cleaning day, we’ve put together a quick reference guide. This table breaks down the specific needs of each major siding type, giving you a clear picture of what’s required for a safe and effective wash.
Siding Material Cleaning Requirements
| Siding Type | Max Pressure (PSI) | Recommended Solution | Special Considerations |
|---|---|---|---|
| Vinyl | 1,300 – 1,500 | Mild Soap & Water, Vinegar Mix | Avoid extreme pressure; it can force water behind panels. Work from the bottom up to prevent streaks. |
| Aluminum | 1,200 – 1,400 | Mild Detergent | Prone to denting and chalky oxidation. Use a soft brush and rinse thoroughly to avoid residue. |
| Wood | 500 – 1,200 | Oxygen Bleach, Mild Soap | Very sensitive to high pressure. Always test on a small, hidden area first. Don’t let water soak into the wood. |
| Fiber Cement | Up to 1,500 | Mild Soap & Water | Durable but can be chipped. Be careful around seams and caulked areas to prevent water intrusion. |
| Brick | 1,500 – 2,000 | Water, Mild Detergent | Can withstand higher pressure, but aging mortar is vulnerable. Avoid harsh acids that can damage mortar. |
This comparison highlights just how different each material is. Wood siding requires the most delicate touch, while brick can handle more force. However, even with brick, you have to be mindful of the mortar’s condition.
When to Call a Professional Instead
Sometimes, a DIY job isn’t the most practical or financially sound decision. If you notice significant cracking, warping, or widespread mold that seems to penetrate the siding, it might be a symptom of a larger issue. Trying to blast away these problems could make them worse. In these situations, consulting with experienced siding contractors in Massachusetts can provide clarity on whether you’re dealing with a simple cleaning job or a repair need.
Professionals not only have the right tools but also the experience to diagnose underlying problems that a simple wash might just cover up. The growing demand for these services highlights their value; the global exterior building cleaning market was valued at USD 10.5 billion in 2023 and is projected to climb to USD 18.9 billion by 2032. This growth shows that more homeowners are recognizing the importance of proper maintenance to protect their investment. You can read the full research about exterior cleaning market trends to see how the industry is expanding.
Getting the Right Equipment Without Breaking the Bank
When you decide it’s time to learn how to clean siding on house, it’s easy to feel like you need a truckload of specialized tools. Marketing can make you think that without professional-grade gear, you’re doomed to failure. But honestly, you don’t need a garage full of expensive equipment to get amazing results. Most homeowners find that a few simple, well-chosen items are more than enough for the job, saving both money and precious storage space.
The trick is to be practical. Before you start daydreaming about that shiny, high-powered pressure washer, take a look at what you already own. For most homes dealing with light to moderate dirt, a standard garden hose with a good spray nozzle, a bucket, and a long-handled, soft-bristle brush are your main tools. This simple setup is not only budget-friendly but also much safer for more delicate siding materials like wood or older vinyl, which can be easily damaged by powerful water jets.
The Great Pressure Washer Debate: Rent or Buy?
Pressure washers are fantastic for speeding things up, but they aren’t a must-have for every situation. If you have a large or two-story home, or if you’re dealing with really stubborn, set-in grime, then a pressure washer can be a lifesaver. However, buying one for a job you’ll probably only do once or twice a year doesn’t make much financial sense. A 2024 review of home improvement stores found that renting a consumer-grade pressure washer for a day often costs less than 15% of its total purchase price.
Renting is a great compromise. You get the benefit of a powerful tool without the cost and hassle of owning and maintaining it. When you go to rent one, ask for a model that has adjustable pressure settings and comes with different nozzle tips. For siding, you’ll likely want a white (40-degree) or green (25-degree) tip. These provide a wide, fan-like spray that cleans effectively without blasting one spot with too much force.
Your Essential Cleaning Toolkit
Let’s put the fancy gadgets aside and build a practical toolkit that will handle just about any siding cleaning job. You probably have most of these things already, and the rest are inexpensive to pick up.
- The Right Brush: Your number one tool should be a soft-bristle brush with a telescoping handle. This allows you to scrub away dirt gently without scratching your siding. The extendable handle is a real back-saver and makes it much safer to reach high spots without teetering on a ladder.
- Buckets: Grab at least two. Use one for your cleaning solution and the other for clean rinse water. This simple system stops you from accidentally putting grimy water back onto the siding you just cleaned.
- Safety First: This part is non-negotiable. Get a good pair of safety glasses to shield your eyes from chemical splashes and dirt. Waterproof gloves are also a must to protect your skin from cleaning solutions, even if you’re using a mild, homemade mix. If a ladder is necessary, make sure it’s stable and on solid, level ground.
- Drop Cloths or Plastic Sheeting: Before you even mix your cleaner, take a few minutes to cover up any delicate plants, flowerbeds, and outdoor electrical outlets near the house. This small prep step prevents damage from cleaning solutions and water runoff and can save you a big headache later on.
Setting Up Your Workspace Like a Pro
The real difference between a smooth, satisfying cleaning day and a frustrating mess often comes down to what you do before a single drop of cleaner hits the wall. Professionals and seasoned homeowners know that a little prep work prevents a lot of headaches. Skipping these steps is how simple projects turn into costly mistakes like damaged flowerbeds, short-circuited outlets, or even water seeping into your foundation.
Taking just 30 minutes to set up your workspace properly is the best investment you can make when learning how to clean siding on a house.
Protecting Your Property and Landscaping
Your prize-winning roses and carefully tended vegetable garden won’t appreciate being doused in cleaning solution, even mild, homemade ones. The same goes for your outdoor furniture, grill, and kids’ toys.
- Cover Your Plants: Use lightweight plastic sheeting or tarps to shield any delicate plants, shrubs, and flowerbeds near the house. You don’t need to seal them tight; just drape the sheeting over them to protect them from runoff. For larger shrubs, you can also give them a good rinse with plain water before and after cleaning to dilute any cleaner that splashes onto them.
- Move Your Belongings: Relocate patio furniture, grills, planters, and any other items away from the house. This not only protects them but also gives you a clear, unobstructed path to work, which is a major safety benefit.
- Secure Electrical Fixtures: Water and electricity are a dangerous mix. Turn off the power to all exterior outlets and light fixtures at the circuit breaker. Cover them securely with plastic and heavy-duty tape to prevent water from getting inside. One homeowner shared a story of shorting out their entire outdoor lighting system because they only relied on the fixture’s built-in cover—a mistake that cost hundreds to repair.
Managing Water Flow and Choosing the Right Day
Once you start spraying, all that water has to go somewhere. Poor water management is a common rookie mistake that can lead to water pooling against your foundation, which can cause significant issues over time. Before you start, check that your gutters are clear and that the ground around your home slopes away from the foundation. If you notice low spots, plan to work in smaller sections to avoid creating large puddles.
Finally, take a look at the weather forecast. An ideal cleaning day is overcast, calm, and mild. Cleaning in direct, hot sunlight can cause your solution to evaporate too quickly, leaving behind soap residue and streaks that are a pain to remove. Likewise, windy conditions can make controlling your spray nearly impossible and can blow chemicals where you don’t want them. If the weather isn’t cooperating, it’s always smarter to postpone. Pushing through bad conditions rarely leads to the clean, professional finish you’re hoping for.
Cleaning Techniques That Actually Work in Real Life
Alright, this is where we move from planning to doing. You’ve got your equipment ready, the area is prepped, and you’re facing a wall that’s seen better days. The real goal isn’t just to make it clean, but to do it smart—without causing headaches down the line. The best methods for how to clean siding on a house are born from experience, figuring out what gets the job done right versus what just pushes dirt around.
Let’s look at the two main ways to tackle this: gentle hand-scrubbing for detailed work and low-pressure washing for covering ground quickly. Each technique has its moment to shine, and knowing which one to use is the secret to getting a pro-level finish.
The Art of Hand-Scrubbing for Precision
Never underestimate the effectiveness of good old-fashioned elbow grease. Hand-scrubbing is fantastic for delicate siding materials or those really stubborn, caked-on spots. It gives you total control, helping you avoid the kind of damage a pressure washer can cause if you’re not careful. For most vinyl, aluminum, and even some painted wood siding, starting with a hand-scrub is often the safest bet.
Think about that persistent green algae film that loves to grow on the shady, north-facing side of the house. Just blasting it with a high-pressure stream can actually spread the spores. A targeted scrub, on the other hand, removes it for good.
- Work in Manageable Sections: Don’t get ambitious and try to clean a whole wall in one go. Stick to a roughly 10×10 foot area at a time. This keeps your cleaning solution from drying and leaving ugly streaks before you can rinse it off.
- Bottom-Up, Top-Down: This is the golden rule of house washing. Always apply your cleaning solution starting from the bottom and working your way up. Why? It stops dirty runoff from creating “clean streaks” down the wall. When it’s time to rinse, you do the opposite: rinse from the top down to wash all the suds and grime away cleanly.
- The Right Motion: Grab your long-handled, soft-bristle brush and scrub parallel to the siding panels, which is usually horizontal. Avoid scrubbing in circles, as this can leave behind swirl marks, especially on older or oxidized aluminum siding.
This hands-on method is also a lifesaver for those tricky spots. Cleaning around windows, light fixtures, dryer vents, and under the eaves requires a careful touch that power tools simply can’t match.
Using a Pressure Washer Without Causing Damage
A pressure washer can be your greatest asset or your biggest liability. When used correctly, it’s a massive time and energy saver. Use it the wrong way, and you could end up forcing water behind your siding, stripping paint, or leaving permanent etch marks. The trick is to see it as a powerful rinsing tool, not a brute-force blaster.
The machine’s main purpose is to apply your cleaning solution evenly and rinse it off thoroughly. The actual cleaning power should come from your detergent and a light scrub with a brush, not the sheer force of the water.
- Choose the Right Nozzle: Always start with the gentlest nozzle, which is typically the white 40-degree tip. It creates a wide, soft spray that’s ideal for rinsing siding. The green 25-degree tip can be used carefully on tougher spots, but proceed with caution. Absolutely never use the red 0-degree (pencil jet) tip on siding—it will literally carve a line into it.
- Maintain a Safe Distance: Keep the nozzle at least 12-18 inches away from the siding surface. Getting any closer risks concentrating the pressure and causing damage.
- Angle is Everything: This is critical. Never spray water directly or upward into the siding. Always point the spray downward at about a 45-degree angle. This mimics the natural flow of rain and keeps water from getting forced up and under the siding panels. Driving water behind siding is a classic DIY mistake that can lead to hidden mold and rot.
While you’re cleaning the walls, glance up at the gutters. If they’re clogged, water can overflow and run down your freshly cleaned siding, causing new streaks and stains. If you see this pattern, your drainage system needs attention. To get a handle on this, it’s worth learning what gutter installation contractors in Massachusetts suggest for proper water management. After all, a clean house starts with a system that works correctly from the top down.
Solving the Problems That Standard Cleaning Won’t Touch
You’ve just spent hours washing your house, but a few stubborn spots remain, almost mocking your hard work. This is where learning how to clean siding on a house really pays off—tackling the annoying problems that a simple soap-and-water scrub can’t fix. Every home has these challenges, from relentless mildew on the north-facing wall to mysterious rust stains under a window.
These aren’t just ugly marks; they can be warning signs of bigger issues. If you let them sit, you risk permanent damage or discoloration. The secret is to figure out what kind of stain you’re dealing with and use the right treatment, much like a doctor diagnosing an illness before writing a prescription. Just scrubbing harder or blasting it with an all-purpose cleaner usually backfires and can even harm the siding itself.
Identifying and Treating Persistent Siding Stains
Let’s get specific. Certain stains have a different chemical makeup than regular dirt and grime, so they need a special approach. For example, oxidation on aluminum or older vinyl siding looks like a chalky, powdery film. If you try to power wash it, you’ll likely end up with ugly, blotchy patches. The correct method is to gently scrub the area with a cleaner designed to break down that oxidized layer without damaging the siding’s finish.
Similarly, rust stains, which you often find below metal fixtures like spigots, vents, or window frames, won’t budge with normal detergent. These stains are basically iron oxide deposits that have fused with your siding. To get rid of them, you’ll need a cleaning agent with oxalic acid or a dedicated commercial rust remover to dissolve the bond.
To help you identify and tackle these common headaches, here’s a quick reference guide.
Common Siding Stains and Solutions
Below is a handy table that breaks down the most common stains you’ll encounter, what causes them, and how to get rid of them for good.
| Stain Type | Common Causes | Best Cleaning Method | Prevention Tips |
|---|---|---|---|
| Mold & Mildew | Shade, moisture, poor air circulation | Mix of 1 part white vinegar to 4 parts water; commercial mold cleaner for severe cases | Trim nearby shrubs; ensure gutters are clean and directing water away from the house. |
| Rust | Runoff from metal fixtures, nails, or sprinklers with high iron content | Commercial rust remover or a solution containing oxalic acid applied with a soft brush | Seal or replace rusting fixtures; adjust sprinklers to avoid spraying the house. |
| Oxidation | Sun exposure degrading the finish on aluminum or older vinyl siding | Specialized siding cleaner for oxidation; apply with a soft brush and rinse thoroughly | Apply a carnauba wax or siding protectant after cleaning to shield the surface. |
| Paint Splatter | Overspray from a previous painting project | Depending on paint type: Latex may come off with a cleaner and gentle scraping; oil-based may require a specific solvent. Test in a hidden area first! | Use painter’s tape and drop cloths meticulously during any future painting projects. |
This table shows that for every problem, there’s a specific solution. Using the right method not only removes the stain but also helps prevent it from coming back.
When Stains Signal a Bigger Issue
Sometimes, a persistent stain is a symptom of a much larger problem. For instance, if you clean mold and mildew from under an eave and it reappears quickly, the siding might not be the real issue. The true culprit could be a leaky roof or a clogged gutter system that’s constantly dumping moisture onto that spot. In these situations, no amount of cleaning will offer a permanent solution.
This is when you need to put on your home inspector hat. If you spot discoloration along siding seams or stains that keep coming back in the same place, it could mean water is getting in behind the siding. It’s crucial to recognize when the problem is more than just a surface-level cleaning job. For complex issues like recurring moisture that might be tied to your roof’s condition, getting advice from expert roofing contractors in Massachusetts can help you find the root cause and avoid serious structural damage. Knowing when to stop scrubbing and start investigating is a vital skill for any homeowner.
Staying Safe While Getting the Job Done
Tackling a big project like cleaning your house siding brings a huge sense of accomplishment, but that feeling can vanish in an instant with a trip to the ER. Safety isn’t just a buzzword; it’s the most critical part of learning how to clean siding on a house. We’ve all heard cautionary tales about weekend projects going south, and most could have been avoided with a bit more planning and respect for the job’s risks. This is about more than just glancing at a warning label—it’s about actively protecting yourself and your home.
Let’s start with the basics: personal protective equipment (PPE). At a bare minimum, you need safety glasses to shield your eyes from chemical splashes and stray debris. Waterproof gloves are also essential to protect your skin from cleaning solutions. Even a gentle homemade mix can cause irritation with enough contact. It’s a small, easy step that prevents the most common types of injuries.
Ladder and Electrical Safety
Working up high naturally brings the biggest risks. When you set up a ladder, make sure it’s on solid, level ground. A wobbly ladder is just asking for trouble. Always keep three points of contact—either two feet and one hand or two hands and one foot. And never, ever overreach. I know it’s tempting to stretch just one more foot to get that last spot, but it’s much safer to climb down and shift the ladder. Overreaching is a major cause of ladder-related falls.
Another serious hazard is electricity. Before a single drop of water starts spraying, do a full walk-around of your home. Pinpoint every exterior electrical component: outlets, light fixtures, and the main service line coming into your house.
- Outlets and Fixtures: Go to your breaker box and shut off the power to all exterior circuits. Then, cover those outlets and lights with plastic and secure it with heavy-duty tape to ensure they stay dry.
- Power Lines: Be extremely careful around the spot where the main power line connects to your home. Never aim a pressure washer or even a strong stream from a garden hose near these connections. Water is an excellent conductor of electricity, and the risk of a severe shock is very real.
Weather, Awareness, and Knowing Your Limits
Sometimes, your biggest challenge is the weather itself. Trying to clean on a windy day isn’t just annoying; it’s genuinely dangerous. Strong gusts can make a ladder unsteady and blow cleaning chemicals right back into your face or onto your neighbor’s prize-winning roses. The ideal time for this job is a calm, overcast day.
As you work, stay tuned in to your surroundings and how you’re feeling physically. Long cleaning sessions can lead to fatigue, and that’s when mistakes tend to happen. Take breaks, drink plenty of water, and if you can, work with a partner. Having an extra person to hold a ladder or pass you tools makes the entire process safer and quicker.
Finally, be honest with yourself about the job’s difficulty. If you live in a house that’s more than two stories high or if the siding shows extensive damage beyond simple dirt and grime, it might be time to call in the professionals. For tricky situations, getting advice from experienced siding contractors in Massachusetts can help you figure out if you’re dealing with a simple cleaning job or a more significant repair. Recognizing when a DIY project is over your head isn’t giving up; it’s just smart homeownership.
Keeping Your Results Looking Great Long-Term
Finishing a major cleaning project feels amazing, but the real win is making that fresh look last. Your hard work doesn’t have to disappear in a few months. With a smart, low-effort maintenance plan, you can go much longer between those big cleanings. The secret isn’t more scrubbing; it’s about being strategic and consistent. A realistic schedule will depend on your specific situation—your local climate, siding material, and unique factors like overhanging trees or living near a busy road all play a part.
The goal is to move from reactive cleaning to proactive maintenance. By taking small, preventative steps, you can seriously reduce the buildup of dirt and grime. This approach saves you time and energy down the line and helps protect your home’s exterior from the slow creep of wear and tear.
Develop a Seasonal Inspection Routine
One of the most powerful habits you can build is a simple seasonal walk-around. This isn’t about deep cleaning; it’s just about paying attention. Spend 15 minutes each season—a good time is at the start of spring and the end of fall—just looking at your siding. You’re trying to spot small problems before they grow.
- Check for Early-Stage Growth: Keep an eye out for the faint green tint of algae or the tiny black specks of mildew. These often show up first on the shaded, north-facing side of a house. Catching it early means a quick spot-clean instead of a full-wall scrub later on.
- Inspect Caulking and Seams: Look closely at the seals around windows, doors, and corner trim. If you see cracked or shrinking caulk, it’s an open invitation for water to get behind your siding, which can lead to much bigger headaches.
- Scan for Damage: Make a note of any new cracks, chips, or loose panels, especially after a big storm. Minor physical damage is often an easy fix, but if you ignore it, it can compromise your home’s entire protective layer.
Mastering Touch-Ups and Minor Repairs
When you find a small issue during your walk-around, deal with it right away. Keeping a small spray bottle of your preferred cleaning solution (like a simple 1:4 vinegar-to-water mix) on hand makes zapping new mildew a two-minute job. If you see a small rust stain under a metal fixture, treating it immediately stops it from setting deep into the siding.
Understanding when a small repair can prevent a major headache is a key part of learning how to clean siding on a house effectively. A loose piece of vinyl siding can often be snapped right back into place. Sealing a small crack in caulk with a tube of exterior sealant costs very little but can prevent hundreds of dollars in water damage repairs. This kind of proactive care is also crucial for other outdoor structures. For instance, properly maintaining your deck’s finish can prevent rot and expensive replacements, a topic that pros like Sabatalo Contracting for deck projects in Massachusetts know all about.
Ultimately, fantastic long-term results come from this cycle of inspection and quick action. This method keeps your home looking its best all year and protects your investment without eating up all your free time. If your maintenance list starts to feel overwhelming, or you spot the same damage reappearing, it might be a sign that calling in professionals is the most cost-effective choice.