Most American wood decks endure at least five months of heavy winter exposure in Massachusetts, leading to costly repairs if neglected. With freezing rain, deep snow, and shifting temperatures targeting vulnerable surfaces, every homeowner faces the risk of structural damage. This guide gives you clear, step by step solutions to protect your investment, minimize headaches, and keep your outdoor space ready to shine when warmer weather returns.
Table of Contents
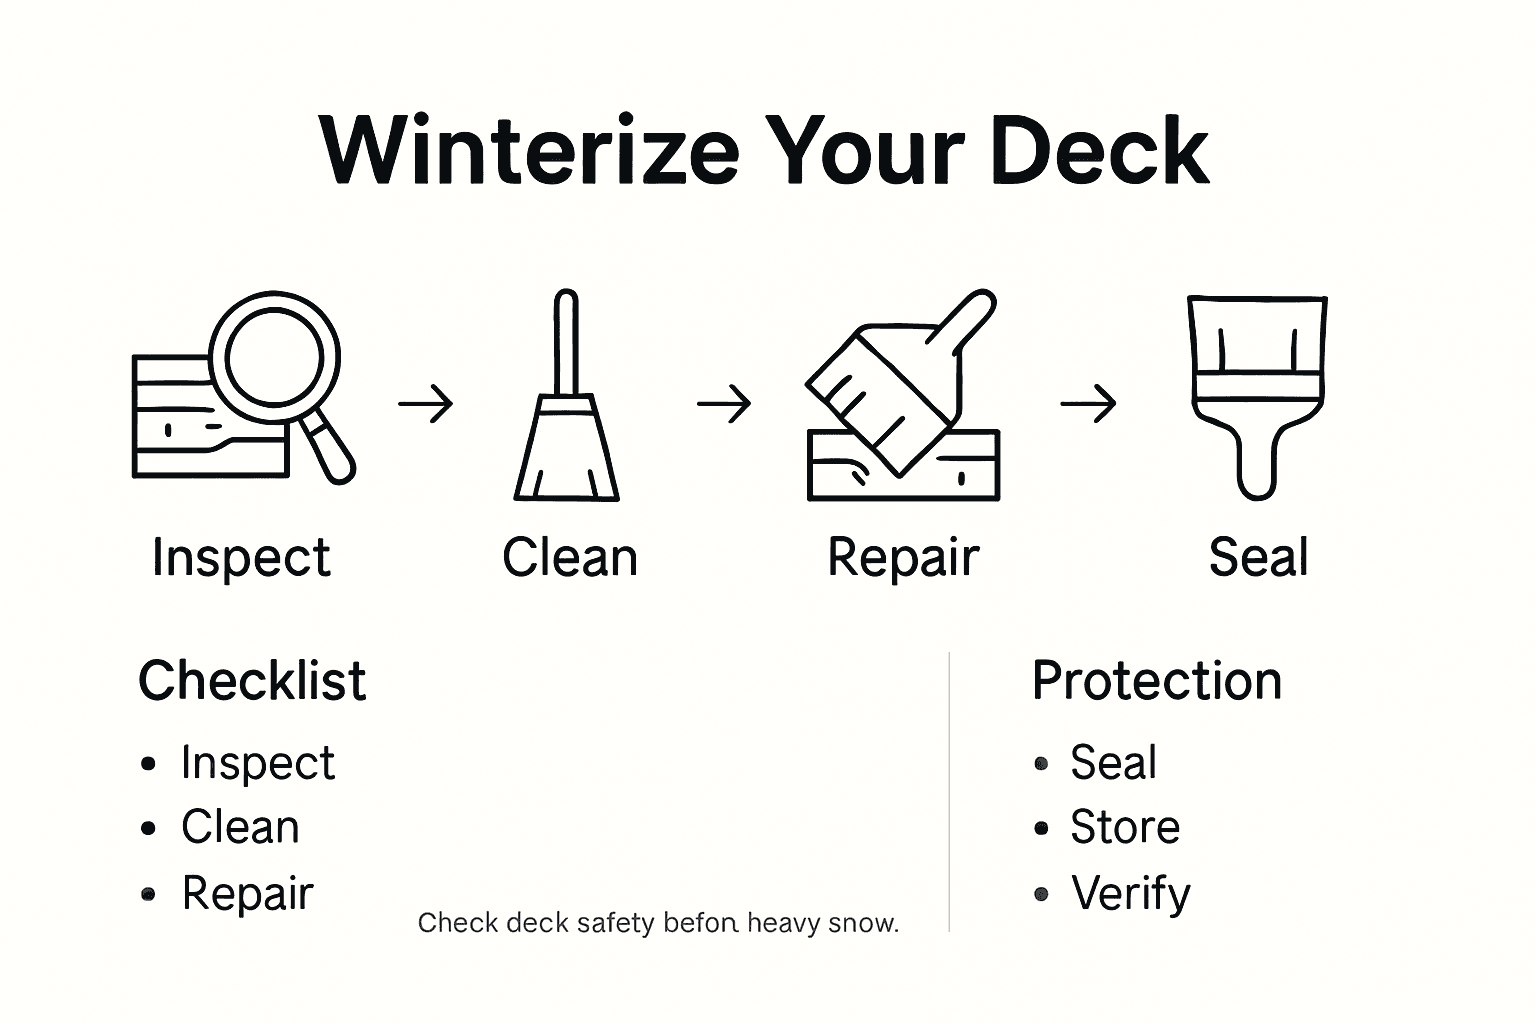
- Step 1: Assess Your Deck For Damage And Wear
- Step 2: Clean And Remove Debris From All Surfaces
- Step 3: Repair Loose Boards And Structural Issues
- Step 4: Apply Protective Sealant For Winter Weather
- Step 5: Inspect And Secure Furniture And Accessories
- Step 6: Verify Deck Readiness For Harsh Conditions
Quick Summary
| Key Insight | Explanation |
|---|---|
| 1. Inspect for Damage and Wear | Conduct a thorough inspection of deck components for cracks, rot, and structural weakness to enhance safety and durability. |
| 2. Clean Thoroughly to Remove Debris | Sweep and remove all debris from the deck’s surface and underneath to prevent moisture retention and wood decay. |
| 3. Repair Loose Boards and Supports | Tighten loose fasteners and replace damaged boards to maintain deck stability and safety under snow loads. |
| 4. Apply Protective Sealant | Use a high-quality sealant to create a moisture barrier that protects your deck from harsh winter conditions. |
| 5. Secure Furniture and Accessories | Store or cover outdoor furniture to prevent damage from winter weather and maintain deck integrity. |
Step 1: Assess Your Deck for Damage and Wear
Preparing your deck for winter begins with a thorough damage assessment. The goal is to identify potential weak points that could compromise your deck’s structural integrity during harsh Massachusetts weather conditions.
Start by conducting a comprehensive visual and physical inspection. Deck safety experts recommend examining all critical structural components, including support posts, deck boards, stairs, railings, and the critical connection between the deck and house. Look for signs of wood rot, loose fasteners, cracked or splintered boards, and any areas showing significant wear. Pay special attention to the ledger board where the deck attaches to your home, as this is a frequent point of potential failure.
When inspecting, use both visual examination and physical testing. Walk the entire deck surface, applying gentle pressure to boards and checking for movement or soft spots. Check wooden surfaces for discoloration, splitting, or signs of moisture damage. Examine metal connectors and hardware for rust or corrosion. Structural assessments should focus on identifying potential load resistance issues that could create safety risks during winter snow and ice accumulation.
Pro Tip: Use a screwdriver to gently probe wooden surfaces for soft or decaying areas the naked eye might miss, which can indicate underlying structural damage.
Here’s a summary of essential inspection points for winterizing your deck:
| Area to Inspect | What to Look For | Why It Matters |
|---|---|---|
| Support Posts | Signs of rot or shifting | Prevents collapse risks |
| Deck Boards | Cracks, softness, splintering | Stops water damage spread |
| Ledger Board | Detachment, damage, decay | Ensures deck remains anchored |
| Metal Hardware | Corrosion, loose fasteners | Maintains overall stability |
| Railings & Stairs | Weakness or looseness | Reduces fall hazards |
Step 2: Clean and Remove Debris from All Surfaces
Cleaning your deck thoroughly is a critical step in winterization that prevents moisture buildup and potential structural damage. By removing all accumulated debris, you will protect your deck and ensure its longevity through the harsh Massachusetts winter months.
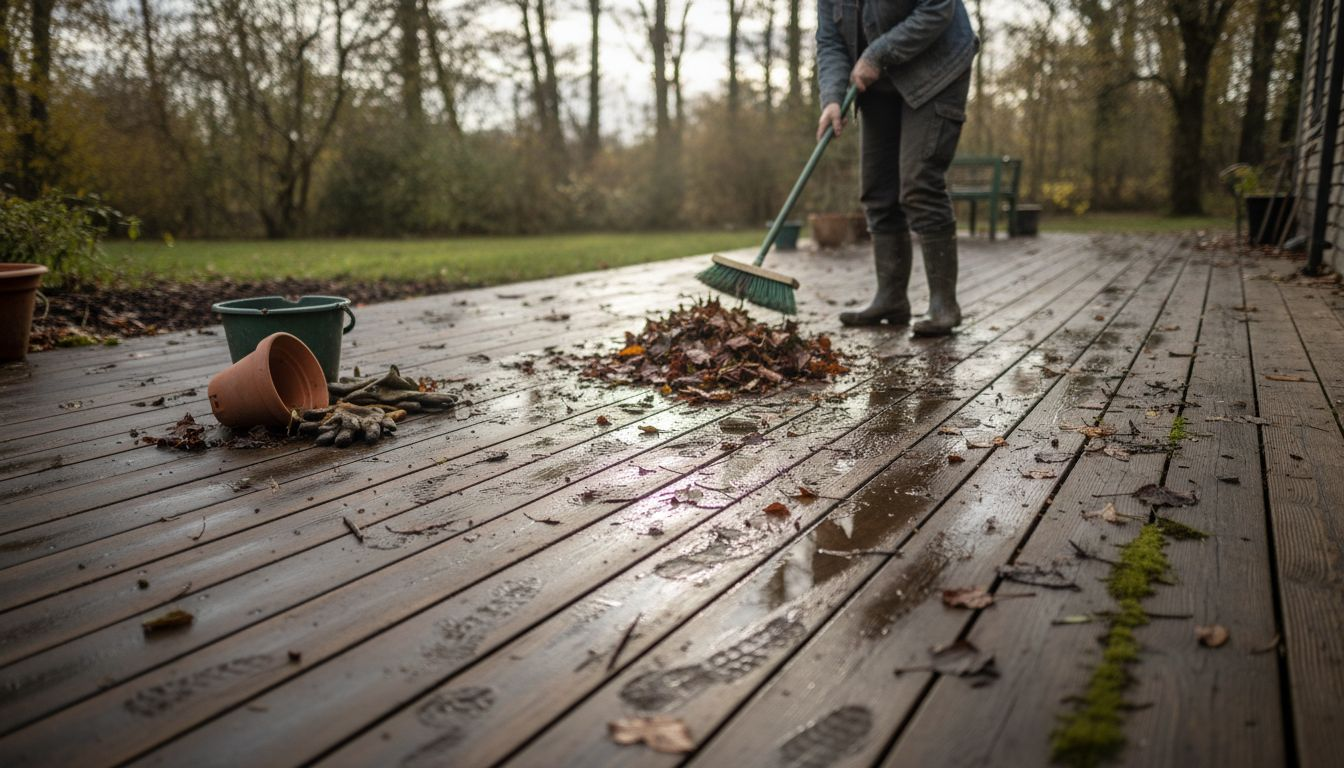
Sustainable debris management requires a comprehensive approach to removing organic materials from every surface and crevice of your deck. Start by sweeping away loose leaves, pine needles, branches, and any other organic matter. Pay special attention to gaps between deck boards, corners, and areas near support posts where debris tends to collect. Use a leaf blower or stiff-bristled brush to dislodge stubborn materials from hard-to-reach spaces.
Beyond surface cleaning, focus on underneath and around your deck. Clearing combustible materials and organic buildup is essential for reducing moisture retention and potential wood decay. Remove any accumulated leaves, branches, or vegetation that might have gathered beneath the deck structure. This prevents moisture trapping, reduces the risk of pest infestation, and helps maintain the overall integrity of your wooden surfaces.
Pro Tip: Consider using a pressure washer on a low setting to blast away deeply embedded dirt and grime, but be careful not to damage the wood surface by holding the nozzle too close or using excessive pressure.
The table below compares surface cleaning methods and their benefits for deck winterization:
| Cleaning Method | Best For | Key Advantage |
|---|---|---|
| Sweeping | Loose leaves, debris | Quick removal of large debris |
| Leaf Blower | Gaps and tough corners | Reaches hard-to-access spots |
| Pressure Washing | Embedded dirt, grime | Deep, thorough cleaning |
| Manual Scrubbing | Stains, sticky residue | Targeted spot cleaning |
Step 3: Repair Loose Boards and Structural Issues
Addressing loose boards and structural problems is essential for maintaining your deck’s safety and preventing potential collapse during winter. Proactive repairs will protect your investment and ensure your deck remains stable under heavy snow loads.
Deck structural inspections reveal common issues like loose fasteners, weakened joists, and unstable connections that require immediate attention. Begin by carefully examining each board, checking for movement, cracks, or signs of wood deterioration. Tighten any loose screws or nails using exterior grade fasteners, replacing them entirely if they show signs of rust or damage. For boards with significant wear, remove and replace them completely to maintain the deck’s structural integrity.
Professional evaluation of deck connections is crucial for preventing potential structural failures, especially where the deck attaches to your home. Inspect the ledger board connection carefully, ensuring all bolts and lag screws are secure and undamaged. Pay special attention to the points where the deck meets the house, as these connections are most vulnerable to moisture and movement. Replace any rotted wood, and consider reinforcing weak areas with additional support brackets or fresh fasteners.
Pro Tip: Keep a spare box of exterior grade deck screws and wood treatment sealant on hand during repairs to quickly address any unexpected damage you might discover.
Step 4: Apply Protective Sealant for Winter Weather
Protecting your deck with a high-quality sealant is the final critical step in winterization. This process creates a robust barrier against moisture, freezing temperatures, and potential structural damage that Massachusetts winter conditions can inflict.
Weatherproofing standards emphasize the importance of selecting and applying protective sealants that can withstand extreme temperature fluctuations. Start by thoroughly cleaning the deck surface and allowing it to dry completely. Choose a waterproof sealant specifically designed for exterior wood surfaces and rated for cold weather performance. Apply the sealant using a roller or sprayer, ensuring complete and even coverage across all deck boards, railings, and structural elements. Work in thin, uniform layers to prevent pooling and allow each coat to dry according to the manufacturer’s instructions.
Protective coatings play a crucial role in preventing wood degradation and reducing long-term maintenance requirements. Pay special attention to areas prone to moisture accumulation, such as board joints, edges, and surfaces near support posts. Multiple thin layers provide better protection than a single thick application. Allow sufficient drying time between coats, and ensure the final layer has ample time to cure before winter weather sets in.
Pro Tip: Check the weather forecast and choose a warm, dry day with temperatures between 50 and 90 degrees Fahrenheit for sealant application to ensure optimal absorption and curing.
Step 5: Inspect and Secure Furniture and Accessories
Prepping your deck furniture for winter requires careful evaluation and strategic storage. The goal is to protect both your outdoor accessories and the deck surface from potential winter damage.
Deck furniture inspections are critical for preventing potential wind damage and structural issues during winter storms. Begin by carefully examining each piece of outdoor furniture for structural weaknesses, rust, or potential instability. Remove lightweight items like cushions, umbrellas, and decorative accessories completely, storing them in a dry indoor space. For heavier furniture pieces that cannot be moved, consider using weatherproof covers or securing them with appropriate anchoring mechanisms to prevent shifting during strong winter winds.
Comprehensive winterization strategies emphasize the importance of removing or safely storing outdoor furnishings. Focus on creating a systematic approach to furniture protection. Group similar items together for easier storage, and consider using climate-controlled spaces like garages or storage sheds. For items that must remain outdoors, use heavy-duty covers that are water resistant and can withstand freezing temperatures. Ensure all covers are securely fastened to prevent wind displacement.
Pro Tip: Take photographs of your furniture arrangement before disassembling and storing, which will help you easily recreate your deck setup when spring returns.
Step 6: Verify Deck Readiness for Harsh Conditions
Conducting a final comprehensive deck readiness assessment is crucial before winter settles in. This careful examination will help ensure your deck can withstand the intense Massachusetts winter weather conditions.
Thorough deck evaluation requires checking multiple critical structural components to prevent potential winter damage. Systematically inspect the entire deck surface, paying close attention to key areas like support posts, connection points, railings, and stairs. Test the stability of each structural element by applying gentle pressure and looking for any signs of movement or weakness. Verify that all previous repairs have been completed effectively and that the sealant application provides complete coverage.
A comprehensive readiness check helps maximize deck safety and longevity during extreme winter conditions. Examine drainage patterns to confirm water will flow away from the deck and not pool or collect in areas that could cause ice formation. Check that all fasteners are secure, railings are tightly anchored, and there are no exposed wood surfaces vulnerable to moisture penetration. Look for any potential stress points that might compromise the deck’s structural integrity when subjected to heavy snow loads or freezing temperatures.
Pro Tip: Create a detailed winter preparedness checklist with photographs documenting each inspection point to track your deck’s condition from year to year.
Protect Your Deck With Expert Winterization Services
Winterizing your deck is essential to safeguarding it against the harsh Massachusetts winter months. Issues like wood rot, loose fasteners, and moisture damage can dramatically reduce your deck’s lifespan and safety if left unaddressed. By following steps such as thorough inspection, debris removal, targeted repairs, and applying protective sealants you protect your home investment and enjoy peace of mind all winter long.
Sabatalo Contracting & Home Improvement understands these challenges and delivers top-tier exterior solutions that enhance durability and curb appeal. Whether you need comprehensive deck maintenance or repairs to secure loose boards and ensure structural stability, our experienced team specializes in home maintenance services tailored to Massachusetts climates.

Don’t wait until winter storm damage compromises your deck. Contact Sabatalo Contracting today to schedule your personalized deck winterization consultation. Protect your outdoor space with craftsmanship you can trust and start the season confident in your home’s safety and longevity.
Frequently Asked Questions
How do I assess my deck for damage before winter?
Start by conducting a thorough visual and physical inspection, focusing on key areas like support posts, deck boards, and railings. Look for signs of rot, loose fasteners, or cracks, and apply gentle pressure to identify any soft spots.
What is the best way to clean my deck for winter?
Remove all debris including leaves, organic materials, and dirt by sweeping, using a leaf blower, or pressure washing at a low setting. Ensure all surfaces and crevices are clean to prevent moisture buildup, promoting a healthier deck environment.
How should I repair loose boards on my deck?
Tighten loose screws and replace any rusted fasteners or damaged boards to maintain structural integrity. Inspect connections, especially the ledger board where the deck meets your home, and reinforce them as needed to enhance stability before winter.
How do I apply sealant to protect my deck in winter?
Choose a waterproof sealant designed for exterior wood surfaces, and apply it in thin, even layers. Work on a warm, dry day to ensure proper absorption, and allow sufficient drying time between coats to maximize protection against winter conditions.
What should I do with my deck furniture before winter?
Remove lightweight items and store them indoors, while heavier furniture should be covered securely with weatherproof covers. This prevents damage from snow and ice, protecting both your furniture and the deck surface from harsh winter weather.
How can I verify my deck is ready for winter?
Conduct a final inspection checking the stability of all structural components and ensuring that repairs and sealant applications are complete. Clear any potential ice buildup areas to prevent stress on the deck caused by heavy winter snow loads.
Recommended
- Deck Contractors in Massachusetts | Sabatalo Contracting
- 7 Essential Steps for Your Winterize Your Home Checklist | Sabatalo Contracting
- Deck Safety Inspection Guide for Massachusetts Homeowners | Sabatalo Contracting
- 7 Steps to a Seasonal Home Maintenance Checklist for MA Owners | Sabatalo Contracting