TL;DR:
- Massachusetts fire safety regulations require fire pits to be at least 15 feet from structures and actively attended during use. Proper site preparation, adhesive-treated masonry, and seasonal maintenance are essential for a durable, safe outdoor fire feature. Local codes may restrict or prohibit wood-burning pits, and professional installation is recommended for gas lines to ensure safety and compliance.
A fire pit transforms a backyard into a gathering spot that works from early spring through late fall in New England. But installing outdoor fire pit projects in Massachusetts come with real legal requirements, climate-specific challenges, and safety standards that most guides ignore entirely. This article covers Massachusetts regulations, smart outdoor fire pit placement decisions, step-by-step DIY construction, and the maintenance habits that keep your fire pit safe season after season.
Table of Contents
- Key takeaways
- Installing outdoor fire pit: Massachusetts rules you must know
- Planning your fire pit location, size, and design
- Step-by-step DIY fire pit setup
- Keeping your fire pit safe all year
- My perspective on fire pits in Massachusetts
- How Sabatalocontracting can help with your outdoor project
- FAQ
Key takeaways
| Point | Details |
|---|---|
| Know Massachusetts regulations first | Fires must sit at least 15 feet from structures; some cities like Worcester ban wood-burning pits entirely. |
| Choose your fuel type carefully | Gas fire pits need licensed professionals for permanent lines; wood-burning pits allow more DIY flexibility. |
| Excavate and prep the base properly | A 6 to 8 inch excavation with a gravel drainage layer prevents frost heave and structural shifting. |
| Ash management is a safety issue | Remove ash at 1 inch thickness and store cooled ash in sealed metal containers away from your home. |
| Seasonal upkeep prevents bigger problems | Cover your fire pit when not in use, inspect for cracks each spring, and check local burn advisories. |
Installing outdoor fire pit: Massachusetts rules you must know
Before you dig a single shovel of dirt, you need to understand the legal framework in Massachusetts. It is not the same as most other states, and local rules vary significantly from town to town.
Massachusetts allows recreational fire pits under state code with specific clearance and attendance requirements. Fires must be at least 15 feet from any structure and must be actively attended with extinguishing tools nearby at all times. That second rule matters more than people realize. A fire pit left unattended for even a few minutes while you grab a drink inside creates legal liability, not just physical risk.
The state also draws a clear line between open burning and recreational fire pits. Open burning for brush is restricted from May 1 to January 15 and requires permits, limited hours, and a 75-foot clearance from dwellings. Recreational fire pits fall under different rules, but that distinction only protects you if your fire pit qualifies as recreational. Burning construction debris or yard waste in your fire pit can reclassify the activity under open burning law.
Some municipalities go further than state minimums. Cities like Worcester ban wood-burning fire pits entirely and only permit gas fire pits under local ordinance. Boston has its own layered fire code. Local fire departments hold enforcement authority, so checking with your town fire marshal before purchasing materials is a genuinely useful step, not just a formality.
Here is a quick reference for Massachusetts fire pit compliance:
- Minimum 15-foot clearance from any structure, fence, or combustible material
- Active attendance required at all times when fire is burning
- Extinguishing tools (water, sand, or fire extinguisher) must be within reach
- Burning household waste, treated wood, or construction debris is prohibited
- Some municipalities require a permit even for recreational fire pits
- Gas fire pit lines require installation by a licensed gas professional
“Local fire departments in Massachusetts have the authority to enforce and exceed state minimums. Always confirm your town’s specific rules before breaking ground on any fire pit project.”
Planning your fire pit location, size, and design
Getting outdoor fire pit placement right determines how much you actually enjoy the space. Most homeowners focus on aesthetics first and regret the functional decisions later.
Choosing the right surface and location
The ground beneath and around your fire pit needs to be level, stable, and non-combustible. Concrete patios, natural stone pavers, and compacted gravel all work well. Grass is not acceptable as a base. Wood decking is a hard no, and if you are wondering about deck safety around fire features, the clearance requirements are substantial enough that most decks simply are not viable locations.

Wind direction matters more than most guides mention. In Massachusetts, prevailing winds generally come from the southwest during summer. Positioning your fire pit so the primary seating faces north or northeast gives guests the least smoke exposure during warmer months. Note where your neighbors’ windows and patios are located. Smoke blowing into a neighbor’s yard is both an annoyance and a potential ordinance violation in dense neighborhoods.
Sizing and seating layout
A 36-inch interior diameter is the standard recommended size for residential fire pits. It generates enough heat for a group without becoming unmanageable. Going larger than 44 inches on a budget build also tends to compromise structural integrity if you are using stacked block construction.
For seating, 4 to 6 feet from flame to seat is the comfort sweet spot, with 15 to 24 inches of legroom between the fire pit edge and the front of any seat. Arrange seating in an open arc rather than a full circle so people can enter and exit without climbing over others. Walkways around the perimeter should be at least 24 to 36 inches wide. When shopping for weather-resistant outdoor seating, checking outdoor furniture materials built for New England conditions will save you replacement costs down the road.
Comparing fire pit types
| Type | Installation effort | Fuel cost | Code complexity | Best for |
|---|---|---|---|---|
| Wood-burning | Moderate DIY | Low | Moderate | Traditional look, rural properties |
| Propane | Low to moderate | Medium | Lower | Portability, suburban yards |
| Natural gas | High, requires licensed pro | Low long-term | Highest | Permanent installations, convenience |
Step-by-step DIY fire pit setup
This is where the fire pit installation guide gets practical. Follow these steps in order and you avoid the most common structural failures.
-
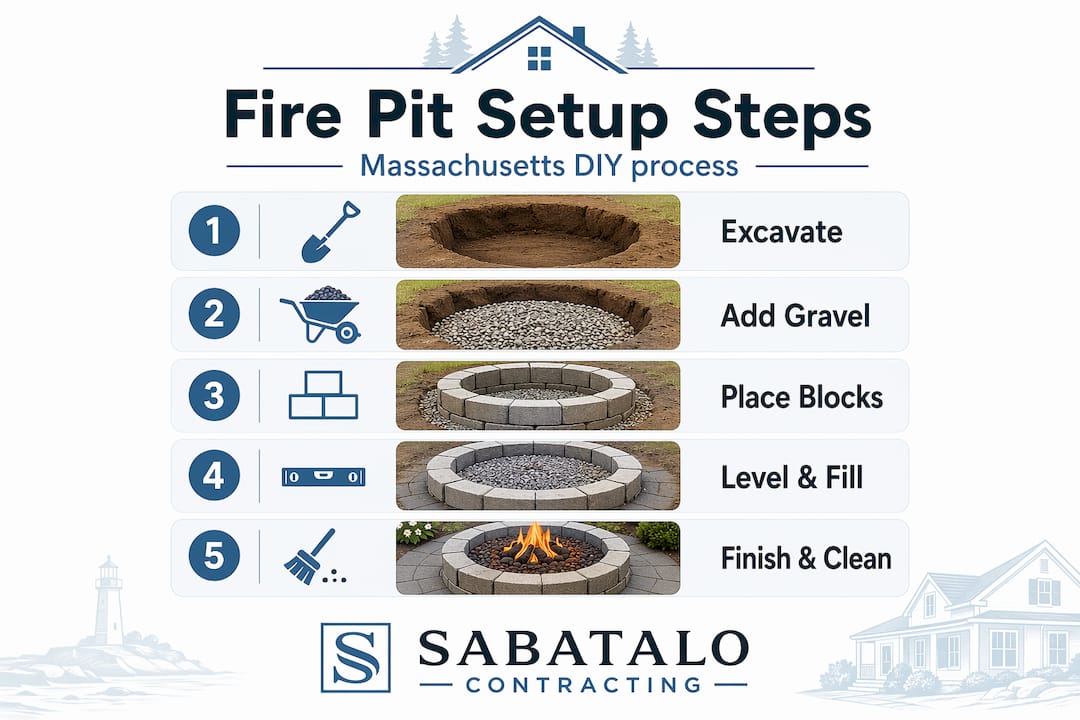
Mark and excavate the site. Use spray paint or stakes to outline your fire pit footprint. Dig down 6 to 8 inches across the entire base area. This depth accommodates a drainage layer and keeps frost heave from shifting your structure during Massachusetts winters.
-
Add the drainage base. Fill the excavated area with 4 to 6 inches of gravel or crushed stone. Tamp it firm. This layer prevents water pooling under your structure, which accelerates deterioration in freeze-thaw cycles.
-
Lay the first course of blocks. Use retaining wall blocks or purpose-built fire pit blocks. Check that each block is level as you go. Uneven first courses cause all subsequent courses to lean.
-
Apply construction adhesive between layers. This is the step most DIY guides skip, and it is the one that matters most in a climate like Massachusetts. Adhesive between blocks dramatically improves structural durability through repeated freeze-thaw stress. Without it, blocks shift within a season or two.
-
Install fire bricks or a metal liner inside the pit. Standard concrete blocks are not rated for sustained high heat. Fire bricks or a steel liner protect the structural blocks and extend the life of the build significantly. Materials for a basic project often run under $100 if you source blocks locally.
-
For gas fire pits, install the burner and gas line. This step requires a licensed professional for natural gas lines. Propane connections are more DIY-accessible but still require careful work. Gas fire pits need two opposite air vents or risers to prevent gas buildup and heat damage to surrounding materials. Match your burner size and BTU rating to your gas line capacity and distance from the fuel source. Avoid corrugated pipes and sharp turns in the line.
-
Test all connections before first use. For gas systems, apply soapy water to connections and watch for bubbles. For wood-burning pits, do a small test fire and check that smoke rises freely and no heat is transferring to surrounding surfaces unexpectedly.
Pro Tip: Never use smooth river rocks or any porous stone inside or immediately around your fire pit. Moisture trapped inside porous rock can turn to steam rapidly when heated, causing the stone to crack or explode.
| Step | Key action | Common mistake |
|---|---|---|
| Excavation | Dig 6 to 8 inches deep | Too shallow; frost heaves the structure |
| Base layer | 4 to 6 inches of compacted gravel | Skipping gravel; water pools and degrades materials |
| Block adhesive | Apply between every course | Skipping adhesive; blocks shift in first winter |
| Liner | Install fire bricks or steel liner | Using unlined concrete; it spalls from heat |
| Gas venting | Two opposing vents or risers | Single vent; gas buildup creates fire hazard |
Keeping your fire pit safe all year
The best fire pit installation tips in the world mean nothing if you ignore maintenance after the build. This is the category where most homeowners lose money and create risks they do not see coming.
Ash management is the most underestimated task. Remove ash when it reaches 1 inch of thickness inside the pit. Ash buildup restricts airflow, stores heat for hours after a fire appears out, and accelerates corrosion in metal fire bowls. Once cooled completely (wait a minimum of 72 hours), transfer ash to a sealed metal container and store it well away from the house and any wood structures.
Each spring, do a thorough inspection. Look for:
- Cracks in blocks or fire bricks (replace any that show damage before the first fire of the season)
- Rust on metal components, especially the liner or grate
- Clogged air vents on gas fire pits
- Loose connections on any gas fittings
- Worn or degraded seals around gas valve components
For wood-burning pits, burn only seasoned hardwoods like oak, hickory, or maple. Proper fuel choice produces cleaner burns with less creosote buildup and fewer sparks. Softwoods like pine pop and throw embers. Avoid treated, painted, or composite wood entirely. The fumes are toxic and the residue damages your fire pit materials.
Pro Tip: Fit your fire pit with a quality fitted cover between uses. A good cover keeps out rainwater, which reacts with ash to form lye, a compound that corrodes metal and degrades mortar faster than almost anything else.
Pairing fire pit upkeep with your general seasonal home maintenance routine makes it easy to stay on top of without creating a separate task list.
My perspective on fire pits in Massachusetts
Working with Massachusetts homeowners for years, I have seen the same pattern repeat itself. Someone builds a beautiful fire pit over a weekend, the first season is wonderful, and by year two the blocks are shifting and they are calling for help. The cause is almost always skipped adhesive and a base that was too shallow to handle the freeze-thaw cycle we get here in New England. Massachusetts winters are genuinely hard on masonry. What works fine in Georgia will fail here.
I have also seen homeowners underestimate how much the gas line decision matters. Propane feels easier upfront. But I have watched enough failed DIY propane connections to tell you plainly: if you are going permanent, pay the licensed professional. The cost difference is not large enough to justify the risk. Permanent gas line requirements exist for a reason, and the fines and repair costs from doing it wrong far outweigh the installation fee.
The thing that consistently surprises homeowners once they have a well-built fire pit? How much they actually use the outdoor space in October and November. Massachusetts fall evenings are some of the best in the country, and a fire pit extends that usable season by six to eight weeks easily. That payoff is real. It is worth doing it right.
— Andrew
How Sabatalocontracting can help with your outdoor project

Planning, permitting, and building a fire pit that will actually last in Massachusetts is a more involved project than most homeowners expect when they start. Sabatalocontracting has spent over 15 years working with Massachusetts homeowners on exactly these kinds of exterior upgrades. From site assessment and local code compliance to professional installation for gas and wood-burning fire pits, the team brings the kind of local knowledge that keeps projects on the right side of town ordinances.
Beyond fire pits, if you are thinking about exterior upgrades that increase home value, a fire pit is a strong starting point but rarely the whole picture. Decks, patios, siding, and hardscaping all work together to create an outdoor living space that adds real equity to your property. Sabatalocontracting handles all of it under one roof, with a track record of completed projects across Massachusetts to back it up. Reach out to plan your exterior remodel and get a consultation that starts with your actual site, not a generic quote.
FAQ
How far does a fire pit need to be from my house in Massachusetts?
Massachusetts requires fire pits to be at least 15 feet from any structure, fence, or combustible material. Some municipalities enforce stricter distances, so check with your local fire department before installation.
Do I need a permit to install a fire pit in Massachusetts?
It depends on your town. Some municipalities require permits for recreational fire pits, while others do not. Gas fire pit installations almost always require permits and a licensed professional for the gas line.
What is the best base material for a DIY fire pit?
A 4 to 6 inch compacted gravel base set inside a 6 to 8 inch excavation is the standard recommendation. Gravel provides drainage and reduces frost heave damage, which is especially important in Massachusetts winters.
Can I install a gas fire pit myself?
You can handle the structure itself, but permanent natural gas lines must be installed by a licensed gas professional in Massachusetts. Propane connections offer more flexibility, though proper venting and line sizing are still critical safety requirements.
How often should I clean my fire pit?
Remove ash when it builds up to 1 inch inside the pit. Do a full inspection of blocks, liners, vents, and connections each spring before your first use of the season.
Recommended
- 7 Best Outdoor Furniture Materials for Massachusetts Homes | Sabatalo Contracting
- Massachusetts Roof Replacement: Homeowner’s Prep Guide | Sabatalo Contracting
- Deck Safety Inspection Guide for Massachusetts Homeowners | Sabatalo Contracting
- 7 Steps to a Seasonal Home Maintenance Checklist for MA Owners | Sabatalo Contracting
